20 April 2012

Artefact and Scene - post order

Artefact
3 x Analysis
Batman
Pirate
Inky bugs
New York
Case study
Images relating to subject
Risk assess
Production plan
Rough draft in B/W & Colour
3 x page of drawings
Final Piece
Evaluation
Scene
Spider diagram
Leaflets and web screenshots
E.G of Questionnaire
Pie charts / Research report
Drafts and ideas
Interview 
Jobs grid
Routes into work
Review and Wider investigation 
Guide


18 April 2012

Treatment for Music Video

Include the following int your treatment/moodboard:


Slide 1
Image and name of artist / Your name / Treatment for .................


Slide 2
Lyrics and location images


Slide 3
Discuss the artist - is the song typical of the other songs put out by the artist?  Is it a change in direction in any way? How are you attempting to package the artist, what image?


Discuss the song - what is it all about? What is the theme? What imagery springs to mind?
How are you going to portray this in your video?


Start writing the video in detail.  Think about starting the written element with... 'The music starts and the video opens with...' and then go on to describe things like the location, what the artist is wearing, what the camera is doing, how the edit is related to the music etc etc

28 March 2012

Level 3 Unit 3 Media Nationals

Plan
Production Schedule
Meeting agenda 1
Meeting agenda 2
Meeting agenda 3
Recce
Risk Assessment
Booking form
Updated production schedule
Final Production
Evaluation

30 January 2012

Coming up with an idea...


Jillian Tamaki has a great post on generating ideas here...

Below is a great example by Tamaki of brainstorming an idea to pieces... You can really see how, starting from the top the ideas just come flooding out.  It is a preliminary piece for a book cover design, try it with any subject matter...


Examples of thumbnailing are by Dustin Harbin       dharbin.com


When I blather on about collecting and drawing anything and everything to do wityh your subject matter, I am talking about (and expecting) sheets of sketchbook like these, again by Jillian Tamaki....


More thumbnailing examples by http://patrickdeancomics.blogspot.com/


Sketchbook pages from Laura Hughes


26 January 2012

Incredible comic process post by Dustin Harbin

Wanna know a little more about how it's done...   Tools        More Tools       Comics Process
Dunstin Harbin creates some great comics - you can spend some money here!


13 January 2012

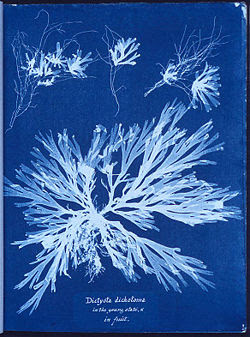
Cyanotypes


Cyanotype – the classic process
Cyanotype process – a modified extract from the book Blueprint to cyanotypes describing the classic or traditional cyanotype process.
Unlike photographs set in silver, like in black and white photography, cyanotypes are using a solution of iron compounds.
The photograph can be taken with a camera, like a digital camera, and the resulting photo turned into a negative that can be used to make a cyanotype.
The basic cyanotype recipe has not changed very much since Sir John Herschel introduced it in 1842. However, some advances have been made by Mike Ware in what is referred to as the New cyanotype process. Ware's cyanotype formula has less bleed, shorter exposure times and a longer density range than Herschel's, but it is also slightly more complicated to mix and uses more toxic chemicals.
The cyanotype process at a glance
The cyanotype process is simple. It can be done easily in a few steps:
Mixing chemicals
The cyanotype is made up of two simple solutions.
                Potassium ferricyanide and Ferric ammonium citrate (green) are mixed with water  separately.
                The two solutions are then blended together in equal parts.
Preparing the canvas
                Paper, card, textiles or any other naturally absorbent material is coated with the solution and dried in the dark.
Printing the cyanotype
                Objects or negatives are placed on the material to make a print. The cyanotype is printed using UV light, such as the sun, a light box or a UV lamp.


Processing and drying
                After exposure the material is processed by simply rinsing it in water. A white print emerges on a blue background.
                The final print is dried and admired.
What you need
Before you start, get all the items you need together.
                25 grams of Ferric ammonium citrate (green)
                10 grams of Potassium ferricyanide
                Water (distilled if possible)
                Scale or measuring spoons
                Measuring jug
                3 glass containers for mixing ingredients
                Plastic spoons
                Face mask (DIY style)
                Goggles
                Rubber gloves
                Apron or old shirt
                Newspaper to cover work surface
                Cleaning cloth
                Brushes or coating rod
                Clothes pegs (plastic)
                Washing line or rope (plastic)
                Art paper or fabric for coating
                Glass or a contact print frame
                Sunshine or a UV light source
Mixing chemicals
Cyanotype is a very simple process. It involves treating a surface with iron salts that reacts to UV light. Wear a face mask and rubber gloves when working with chemicals. In this case, Ammonium ferric citrate and Potassium ferricyanide. Two separate solutions are made and then equal quantities of each solution is mixed together in a third container.
The formula
This recipe makes approximately 50 8×10 inch prints. The cyanotype is made up of two simple solutions:
                Solution A: 25 grams Ferric ammonium citrate (green) and 100 ml. water.
                Solution B: 10 grams Potassium ferricyanide and 100 ml. water.
1
Mixing the chemicals
Dissolve the chemicals in water to make two separate solutions. Add Ammonium ferric citrate to water into one container and Potassium ferricyanide to water in another. Stir with a plastic spoon until the chemicals dissolve. Mix equal quantities of each solution together in a third container. Unused solutions can be stored separately in brown bottles away from light, but will not last very long once they have been mixed. Dispose of any unused chemicals in a sensible and environmentally friendly way!
  
Your work area
Your floors, carpets, walls, work surfaces, clothes and skin can be stained by the chemicals. Cover all possible areas, use rubber gloves and an apron or an old shirt to work in. If you have the space, choose an area where you can spread out. Ordinary light bulbs or tungsten light is safe to use, but UV light will affect your prints. Some fluorescent lighting may also affect your prints.
2
Preparing the canvas
Using a brush, simply paint the chemicals onto the material. Paper, card, textiles or any natural material can be used to print on. Decide how big your print is going to be, and cut your material to size. Make sure your working area is dimly lit, or lit with a low-level tungsten bulb. Once the material is coated, leave it to dry in the dark.
3
Printing the cyanotypePrint a cyanotype by placing your negative (to reproduce a photograph) or object (to make a photogram) in contact with your coated paper or fabric. Sandwich it with a piece of glass. Expose the sandwich to UV light. Natural sunlight is the traditional light source, but UV lamps can also be used. A photogram can also be made by placing items on the surface. Plants, decorative items or other objects can be used to create silhouettes or interesting shapes. Exposure times can vary from a few minutes to several hours, depending on how strong your lightsource is or the season where you are printing.
4
Processing and drying
When the print has been exposed, process your print by rinsing it in cold water. The wash also removes any unexposed chemicals. Wash for at least 5 minutes, until all chemicals are removed and the water runs clear. Oxidation is also hastened this way – bringing out the blue color. The final print can now be hung to dry and be admired.
Good luck!


12 January 2012

Screen Print

Screen Print

Task:
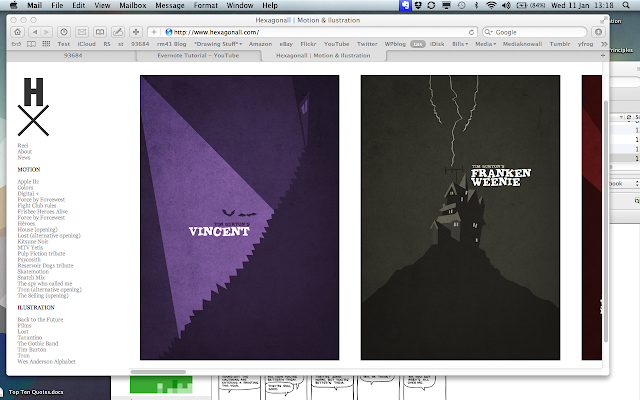
1. Look at the examples from the Hexagonall studio below of the Tim Burton film posters and note that the compositions are made up of very simple shapes and refer to an iconic moment or image from the film. (I have posted some more examples to get your creative weasels racing)

2. Choose either a favourite film / tv programme / song / band / famous person

3. Design a poster for your chosen subject that includes something that sums up the person or event. Composition is of muchos importance for this task.  The posters by Hexagonall work so well because they use interesting compositions firsthand foremost.  Think about cropping, camera angle, edge texture and simplicity.


Notes for Unit 3 personal study


Notes for Unit 3 personal study

Just in case it has slipped your mind... don't forget that you will have had to do plenty of initial research and note-taking prior to formulating your thoughts for this personal study.  You must NOT start before you have immersed yourself in the artists work, investigated (read about) key works and understood the contextual standpoint the artist os operating from.


Always keep in mind that use of 'critical vocabulary' will get you into the top marks.  My case study help book is brimming with vocabulary for this purpose.


Keep a note of your sources. These must be evidenced in your bibliography.
2500 works will be enough. 
Mail me sections as you go along in order for me to check your progress.


A possible plan…

Introduction into what you are going to be doing during this unit. 

Why have you chosen this?  What have you done previously that interested you and got you started?
Talk about both the research you hope to do.
Who is the main artist / designer / movement that has influenced your work?
What are the key components that differentiate their work from others?
Context - where do they sit in the bigger scheme?
Why are they doing the work that they do? 
What contextual matters have shaped this? Include some relevant biographical info.  
What are the recurring themes that you come to expect from the artist?

Talk about a typical piece in detail. Use the case study questions to inform your analysis. 
Include some relevant biographical info.
Crop and show some details to illustrate your point.
Search out some relevant quotes to back up your points.

Now discuss another key work.  Compare and contrast with the previous work.
Now talk about a third, again compare and contrast.  
What are the similarities and differences between the  peices?  What are the continuing themes? 

Introduce your work. What is it that made you choose this artist in the first place?  
GIve an example of where you have been influenced by the artists... could be process / subject matter / technique

Discuss a fourth piece of interest. Deconstruct and analyse as you have for the previous pieces. 

Introduce a similar artist that is linked in some way.  (This could be similar themes, subject matter, techniques etc)
This artist could possibly be a contemporary of the artist.
Include some relevant biographical info.
What are the key components that differentiate their work from others?
Context - where do they sit in the bigger scheme?
Why are they doing the work that they do? What contextual matters have shaped this?
Talk about a typical piece in detail. Crop some details to illustrate your point.
What similarities and differences are there to the other peices that you have chosen?
Search out some relevant quotes to back up your points.

Now discuss another key work.  Compare and contrast with the previous work again compare and contrast.  What are the similarities and differences between the pieces?  What are the continuing themes? 

Introduce another artist that is either continuing the tradition or conversely, at the inception of this lineage.


Now go back through your writing and see where you can add sentences littered with 'critical vocabulary'.


Context - the circumstances that form the setting for an event, statement, or idea, and in terms of which it can be fully understood and assessed:
Lineage lineal descent from an ancestor. Basically who came before them. that influenced them.
Critical - expressing or involving an analysis of the merits and faults of a work of literature, music, or art
Vocabulary - the body of words used in a particular language.
Bibliography - a list of the books referred to in a scholarly work, usually printed as an appendix. This must include the author, title, publisher and date of publication.